
About PayPal
| Logo |
|
|---|---|
| Info | Computop processes PayPal payments, which offers you worldwide merchant protection and a potential of 425 million international customers in more than 200 countries. PayPal is one of the most popular online payment methods and it can be used in e- and m-Commerce. |
| Type | Payments by eWallet |
General information about PayPal
PayPal has remained at the forefront of the digital payment revolution for more than 20 years. By leveraging technology to make financial services and commerce more convenient, affordable, and secure, the PayPal platform is empowering more than 425 million costomers and merchants in more than 200 markets to join and thrive in the global economy.
Customers in Germany can pay via direct debit, giropay or credit card (American Express, Diners Club, Discover, MasterCard, Visa). Members log into their PayPal account with their email address and a password during checkout and choose the preferred funding source - direct debit, credit card, PayPal credit (Pay Later) and, if applicable purchase on account or by instalment.
For more details visit https://www.paypal.com/.
PayPal Shortcut (former "Express Checkout Shortcut (ECS)")
Computop Paygate offers the PayPal Shortcut to shorten the order process: Your customer does not need to enter any address data but rather click on Checkout with PayPal in the shopping cart area, log on and select the invoice- and delivery address retained by PayPal. Paygate then sends the delivery address as a result parameter back to your shop.
Buyers and vendors are protected
PayPal offers buyers and merchants extensive buyer/vendor protection in case "Pay with PayPal" is used as payment method (this excludes alternative payment methods). Buyers are able to claim money back from PayPal in the event of non-fulfilment of a contract of sale. With address verification and PayPal seller protection PayPal removes the merchant of the risk of payment failures in the case of direct debit payments, German credit card payments and unjustified customer complaints. Vendor protection is always linked to PayPal rules and conditions. PayPal risk management with buyer protection and address verification is provided to you via the Computop Paygate.
Payment online globally
PayPal is particularly beneficial for overseas customer acquisition. Computop Paygate supports all currencies and markets offered by PayPal. In many countries PayPal offers customers typical payment methods for their country. Customers abroad can often use typical payment methods such as prepaid cards in Italy or debit cards in the UK. Integrating PayPal into your shop provides the option to present your customers several payment methods at once. Of course you are also free to just present "Pay with PayPal" only.
Advantages of Orders V2 ("PayPal Checkout")
Orders V2 has the following advantages against PayPal NVP and SOAP.
- Orders V2 is the basis for any future development of products and featured by PayPal. PayPal will not develop any new feature/extend existing functionality based on PayPal NVP and SOAP anymore.
- Orders V2 adheres to the latest compliance standards.
- Orders V2 offers smoother checkout process using a lightbox (by using JS SDK, so-called "PayPal Mini Browser"), a window overlay that appears on top of the merchant’s online shop page. This allows the customer to stay on merchant's page and to not lose focus.
Further information can be found on the webpage of PayPal (https://www.paypal.com).
Important information
Please note that, unlike our currency table, the currencies HUF (Hungarian ‒ Forints), JPY (Japanese Yen) and TWD (Republic of China ‒ Taiwan-Dollars) must be given without decimal places.
Example: To transfer 100.00 HUF one enters the amount=100.
This exception applies only for the PayPal payment method. For more details refer to https://developer.paypal.com/reference/currency-codes/.
On this page
Process flow
PayPal process flow
Configuration for PayPal
PayPal Sandbox test account
If you prefer to test the integration before going Live, and you do not have PayPal Sandbox test account, you should create PayPal Sandbox test account as first step.
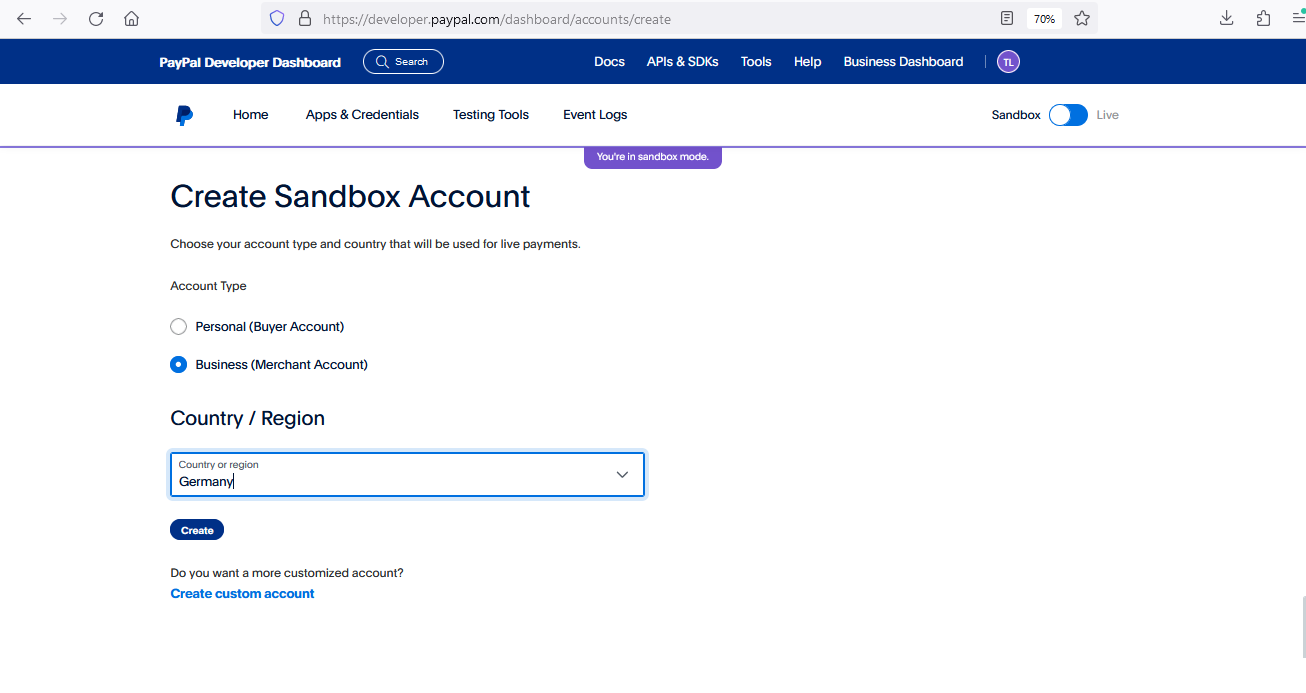
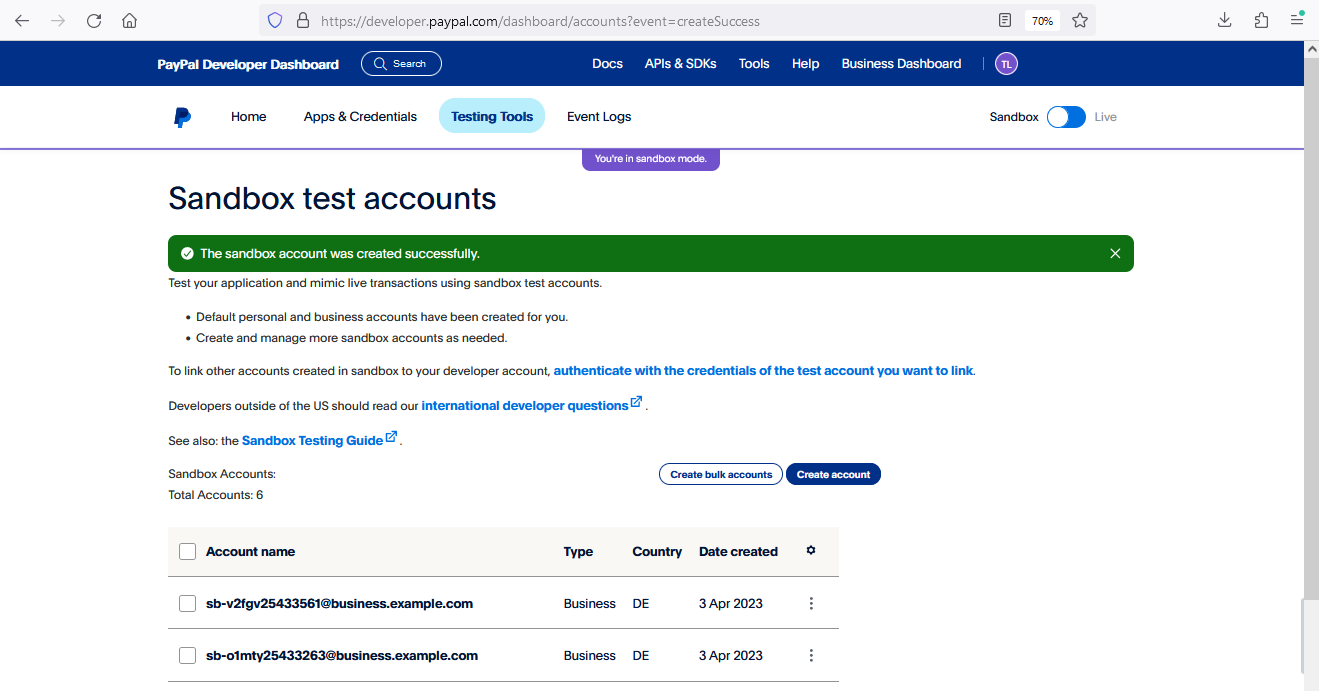
1. Login to https://developer.paypal.com/ and go to "Testing Tools" => "Sandbox Accounts"

2. Click "Create account" and choose "Business (Merchant Account)" & Germany as "Country / Region".
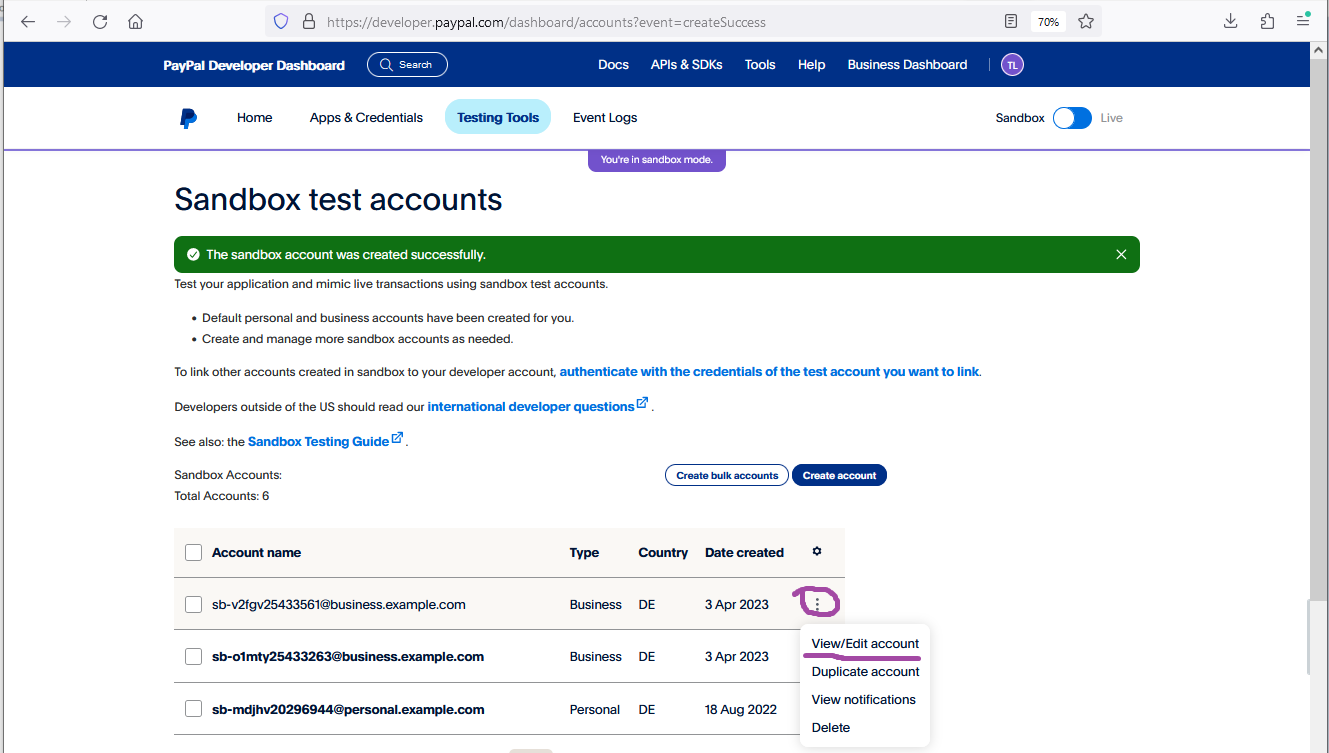
3. Choose "View/Edit account"
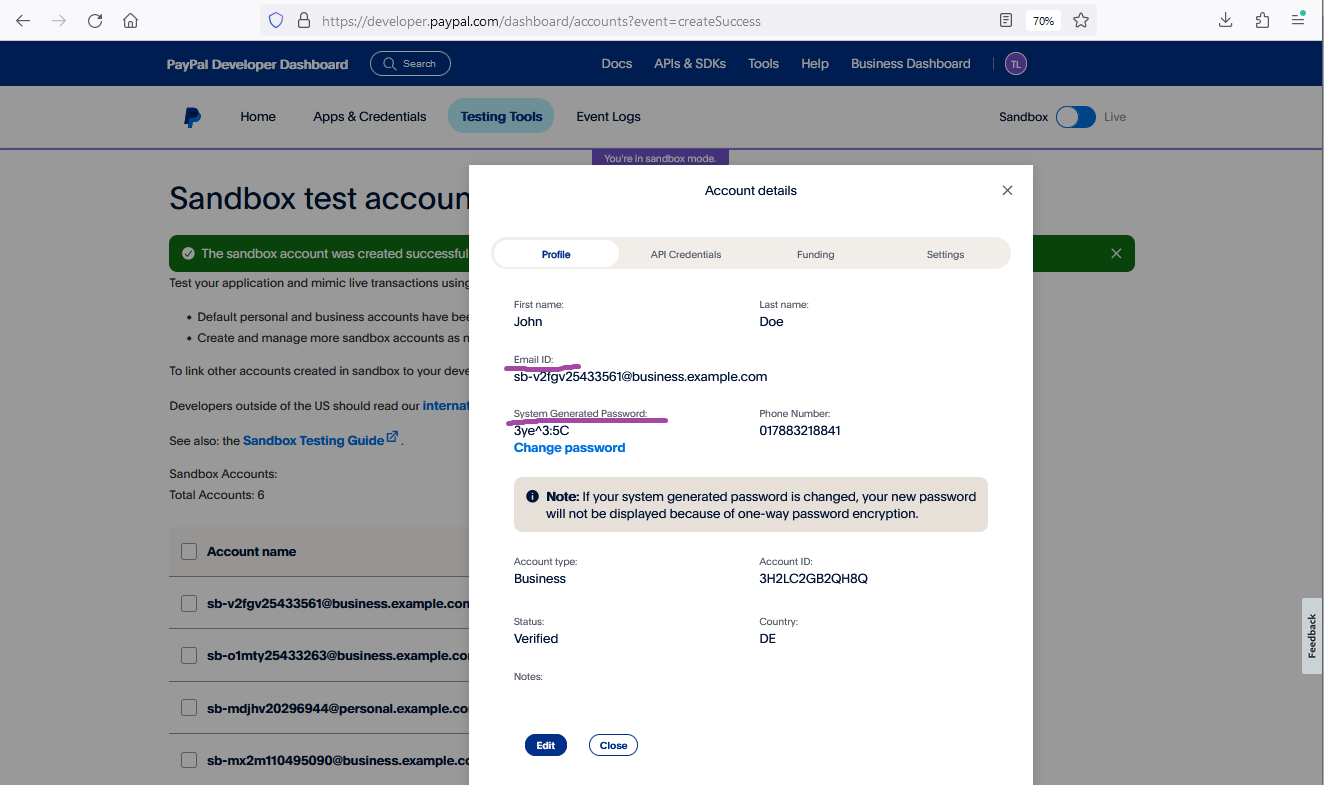
4. Take "Email ID" and "System Generated Password" and use them as Login/Pass for Sandbox on the next step.
Grant permissions to Computop Paygate for transaction processing
In order to allow Computop processing transactions on your behalf, corresponding permissions should be granted to Computop.
Permissions can be granted to Computop under your PayPal account. Please use the following links to login into your PayPal account and follow the steps.
Send PayerID to Computop Merchant Services
To complete merchant setup on Computop side, you should send PayerID to Computop Merchant Services.
PayPal Sandbox
1. Login to https://developer.paypal.com/dashboard and go to "Testing tools" --> "Sandbox Accounts".

2. Select the appropriate Sandbox merchant account and notify Merchant Services about "Account ID".

PayPal Production
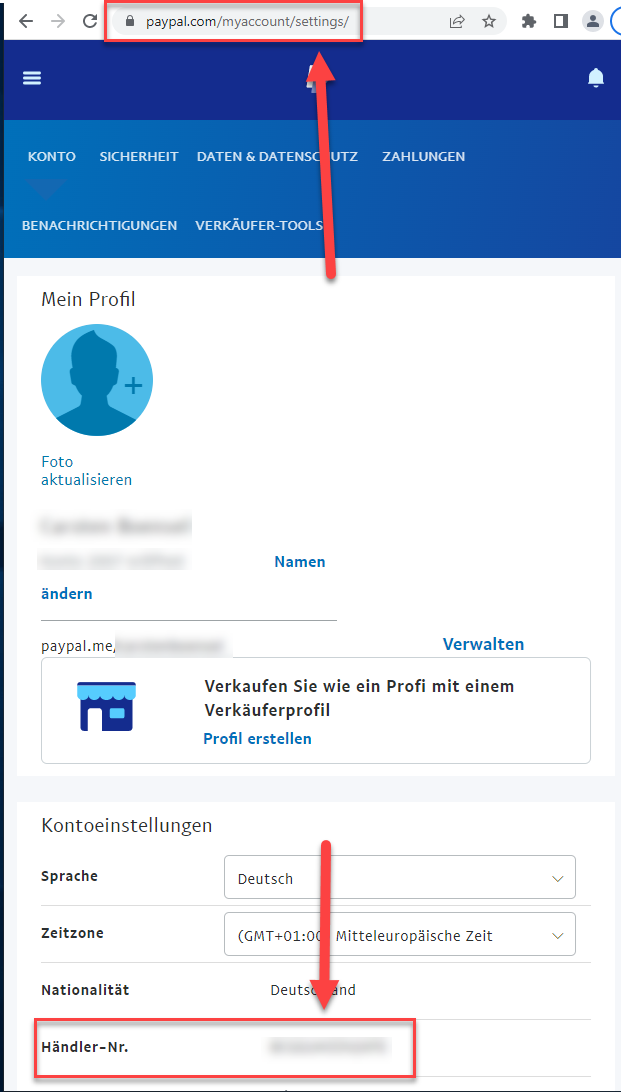
PayerID can be found under your PayPal account by https://paypal.com/myaccount/settings/ , as follows. PayerID uniquely identifies merchant in PayPal.
PayPal Smart Button
There are two ways for integration of PayPal V2 via Computop. First one is by using Computop JavaScript module. Another one is setting up PayPal button by copy-paste of JavaScript code, which is prepared below.
Computop JavaScript module
The Computop PayPal JavaScript module provides client-side technology to complement with the integration of PayPal V2 via Computop.
- The module provides quick installation, using one command
- Configuration is done in one place
- Suitable for all platforms which support JS
For the module and the installation instruction please refer to Readme.
Setting up the PayPal Button
The client-side implementation of PayPal is realized using the PayPal JavaScript SDK.
Depending on your setup, you can use the following script or prepare you own, using the official PayPal JavaScript SDK documentation https://developer.paypal.com/sdk/js/reference/#link-buttons.

While you are testing in sandbox, you can use client-id that matches your test app from PayPal web developer portal. When going live, replace this with the live client-id.
<!DOCTYPE html>
<html lang="en">
<head>
<meta charset="utf-8"/>
</head>
<body>
<!-- Set up a container element for the button -->
<div id="paypal-button-container"></div>
<!-- Include the PayPal JavaScript SDK -->
<!-- Replace <PayerID> with your value, available under your PayPal account -->
<!-- Replace <Currency> with the currency which should be used, e.g., EUR -->
<!-- When going live, replace client-id with the live client-id provided by Computop -->
<!-- When going live, replace data-partner-attribution-id with the live data-partner-attribution-id provided by Computop -->
<script type="text/javascript" src="https://www.paypal.com/sdk/js?client-id=ARCsDK7xBFxa5pnGxk8qvB0STB07fyi_yHDRrb5al6gxahj73Pxg9X2l7onP9J2IN-LqcVJojys94FLK&merchant-id=<PayerID>¤cy=<Currency>&intent=capture" data-partner-attribution-id="Computop_PSP_PCP_Test"></script>
<!-- Initialize and show PayPal button -->
<script type="text/javascript">
let mid = "YOUR MERCHANTID";
let len = "LEN OF UNENCRYPTED BLOWFISH STRING";
let data = "BLOWFISH ENCRYPTED STRING";
let payid;
if (len != '' && data != '') {
// Set the request parameter MerchantID, Len and Data
const params = new URLSearchParams({
MerchantID: mid,
Len: len,
Data: data
});
// Render the PayPal button into #paypal-button-container
paypal.Buttons({
// Choose either 'paypal.FUNDING.PAYPAL' or 'paypal.FUNDING.PAYLATER'
fundingSource: paypal.FUNDING.PAYPAL,
// Call your server to set up the transaction
createOrder: function(data, actions) {
return fetch('https://www.computop-paygate.com/ExternalServices/paypalorders.aspx', {
method: 'POST',
body: params
}).then(function (res) {
return res.text();
}).then(function(orderData) {
let qData = new URLSearchParams(orderData)
payid = qData.get('PayID');
return qData.get('orderid');
});
},
// Call cbPayPal.aspx for continue sequence
onApprove: function (data, actions) {
var rd = "MerchantId=" + mid + "&PayId=" + payid + "&OrderId=" + data.orderID;
// Build an invisible form and directly submit it
const form = document.createElement('form');
form.method = 'POST';
form.action = 'https://www.computop-paygate.com/cbPayPal.aspx?rd=' + window.btoa(rd);
form.style.display = 'none';
// Add form to body
document.body.appendChild(form);
// Submit form
form.submit();
},
onCancel: function (data, actions) {
var rd = "MerchantId=" + mid + "&PayId=" + payid + "&OrderId=" + data.orderID;
// Build an invisible form and directly submit it
const form = document.createElement('form');
form.method = 'POST';
form.action = "https://www.computop-paygate.com/cbPayPal.aspx?rd=" + window.btoa(rd) + "&ua=cancel&token=" + data.orderID;
form.style.display = 'none';
// Add form to body
document.body.appendChild(form);
// Submit form
form.submit();
},
onError: function (data, actions) {
var rd = "MerchantId=" + mid + "&PayId=" + payid + "&OrderId=" + data.orderID;
// Build an invisible form and directly submit it
const form = document.createElement('form');
form.method = 'POST';
form.action = "https://www.computop-paygate.com/cbPayPal.aspx?rd=" + window.btoa(rd) + "&ua=cancel&token=" + data.orderID;
form.style.display = 'none';
// Add form to body
document.body.appendChild(form);
// Submit form
form.submit();
}
}).render('#paypal-button-container');
}
</script>
</body>
</html>
Enabling PayPal Pay Later Button
The above piece of code contains the following line. In this line it will be possible to define which funding sources will be allowed in the web shop.
<script type="text/javascript" src="https://www.paypal.com/sdk/js?client-id=sb¤cy=EUR&disable-funding=giropay,sofort,sepa,card&intent=capture"></script>
The line corresponded to the following button. By default (using the above line) only PayPal button will be available.

If it is required to have PayPal Pay Later Button in addition to standard PayPal button, the button can be enabled by using parameter enable-funding like follows.
<script type="text/javascript" src="https://www.paypal.com/sdk/js?client-id=sb¤cy=EUR&disable-funding=giropay,sofort,sepa,card&enable-funding=paylater"></script>
As a result the following two buttons will appear.

Full list of values for disable-funding and enable-funding can be found by the link below.
https://developer.paypal.com/docs/regional/th/checkout/reference/customize-sdk/#components
Parameter intent
The above piece of code contains the following line.
<script type="text/javascript" src="https://www.paypal.com/sdk/js?client-id=sb¤cy=EUR&disable-funding=giropay,sofort,sepa,card&intent=capture"></script>
Paygate offers 3 possible options for a payment.
- SALE (capture=Auto) (when Paygate automatically sends Capture for a payment; this is the default scenario matching most merchant's needs)
- AUTHORIZE (capture=Manual + txtype=Auth) (when Capture should be sent later by the merchant as a separate API call)
- ORDER (capture=Manual + txtype=Order) (when Authorize and Capture should be sent later by the merchant as separate API calls)
Parameter intent in the above line must be in synch with these options.
If SALE option is used, parameters intent must be set to "capture" as below.
<script type="text/javascript" src="https://www.paypal.com/sdk/js?client-id=sb¤cy=EUR&disable-funding=giropay,sofort,sepa,card&intent=capture"></script>
If AUTHORIZE or ORDER option is used, parameters intent must be set to "authorize" as below.
<script type="text/javascript" src="https://www.paypal.com/sdk/js?client-id=sb¤cy=EUR&disable-funding=giropay,sofort,sepa,card&intent=authorize"></script>
It is important to set proper value for parameter intent, otherwise an error appears.
Banner
It is possible to show a banner with additional details about usage of "Pay Later" option just under "Pay Later" button.

For this, the following code should be added to the body of product page, and parameter "data-pp-amount" should be updated by actual amount value.
<div
      data-pp-message
      data-pp-style-layout="text"
      data-pp-style-logo-type="inline"
      data-pp-style-text-color="black"
      data-pp-style-text-size="12"
      data-pp-amount=<amount-value>
      data-pp-placement="product"
</div>
PayPal Button Style
The above piece of code for PayPal Button does not have any style-related parameters. This piece of code assumes default PayPal style for the button as follows.

PayPal allows to define different PayPal Button style by using parameters shape, color, layout and label. Full list of style-related parameters can be find by the following link.
https://developer.paypal.com/docs/checkout/advanced/style-guide/
Paygate interface
Format Description a alphabetical as alphabetical with special characters n numeric an alphanumeric ans alphanumeric with special characters ns numeric with special characters bool boolean expression (true or false) 3 fixed length with 3 digits/characters ..3 variable length with maximum 3 digits/characters enum enumeration of allowed values dttm ISODateTime (YYYY-MM-DDThh:mm:ss) Abbreviation Description CND condition M mandatory O optional C conditional Notice: Please note that the names of parameters can be returned in upper or lower case.Definitions
Data formats
Abbreviations
Comment If a parameter is mandatory, then it must be present If a parameter is optional, then it can be present, but it is not required If a parameter is conditional, then there is a conditional rule which specifies whether it is mandatory or optional
Calling the interface
Use the following URL and parameters to initiate a PayPal payment in the Paygate form:
https://www.computop-paygate.com/ExternalServices/paypalorders.aspx |
With this URL Paygate supports two different PayPal methods: One the one hand you can offer PayPal quite normally as an additional payment method for the conclusion of a sale. Otherwise you can use PayPal Express Checkout Shortcut, which connects the customers from the shopping cart directly to PayPal, where they can then select their delivery and invoicing address. The customer saves having to re-enter address details and you, as the merchant, enjoy PayPal vendor protection.
Paygate also supports the separation of authorisation and capture for PayPal Express Checkout. You can set parameters via the Paygate to control whether the amount on the customer's PayPal account should be blocked or captured immediately.
Notice: One of the following conditions must be fulfilled to enable you to benefit from PayPal seller protection. Either the customer uses PayPal Express Checkout and selects a delivery address which it has saved previously with PayPal, which Paygate transmits to your shop. Or your shop transmits the already known delivery address to PayPal. Seller protection applies only if the goods have been supplied to this specified address. There may be no more than 3 days between the authorisation of the amount in the customer's PayPal account and capture if you wish to benefit from seller protection. Paygate therefore supports several alternatives for the processing of PayPal payments: we shall be happy to advise you about the implementation of PayPal.
Notice: For security reasons, Computop Paygate rejects all payment requests with formatting errors. Therefore, please use the correct data type for each parameter. The following table describes the encrypted payment request parameters:
| Key | Format | CND | Description |
|---|---|---|---|
ans..30 | M | MerchantID, assigned by Computop. Additionally this parameter has to be passed in plain language too. |
| Key | Format | CND | Description |
|---|---|---|---|
| TransID | ans..64 | M | TransactionID provided by you which should be unique for each payment |
| Key | Format | CND | Description |
|---|---|---|---|
| refnr | ans..30 | O | Merchant’s unique reference number |
Key | Format | CND | Description |
|---|---|---|---|
Amount | n..10 | M | Amount in the smallest currency unit (e.g. EUR Cent). Please contact the Computop Helpdesk, if you want to capture amounts <100 (smallest currency unit). If OrderDesc(n) is used, there must be valid: Amount=ItemTotal+TaxTotal+SHAmount. |
| Key | Format | CND | Description |
|---|---|---|---|
| Currency | a3 | M | Currency, three letters DIN / ISO 4217, e.g. EUR, USD, GBP. Please find an overview here: A1 Currency table. Please note the global PayPal supported currencies at https://developer.paypal.com/api/rest/reference/currency-codes/. |
| Key | Format | CND | Description |
|---|---|---|---|
an64 | M | Hash Message Authentication Code (HMAC) with SHA-256 algorithm. Details can be found here: |
Key | Format | CND | Description |
|---|---|---|---|
Capture | a..6 | O | Auto or Manual: determines whether the requested amount is settled immediately or at a later stage. Important Note: Please contact Computop Helpdesk for Manual, to discuss different possibilities of usage. Important Note: In case of Multi-Seller Payment (Marketplace functionality) only Auto is possible. |
TxType | ans..5 | C | Obligatory for Capture=Manual: Transaction type with possible values Order or Auth. For initial Billing Agreement transaction (Billing Agreement creation) TxType=BAID. In case TxType=BAID, all parameters except the following are optional. RefNr MUST be unique for each Billing Agreement creation transaction.
|
PayPalMethod | enum | O | The "shortcut" value selects the changed transaction procedure which takes the customer back to the shop for payment confirmation. You then need to call up the interface paypalcomplete.aspx to complete the sale. |
RTF | ans1 | O | Reserved for future use |
OrderDesc | ans..127 | M | Description of purchased goods, unit prices etc. |
OrderDesc(n) | ans..127 | O | Customers shopping basket in the form: OrderDesc(n)=Name,Amount,Number,Quantity,Description,Tax OrderDesc2 to max. OrderDesc99 permissible. For more information, please visit PayPal at https://developer.paypal.com/docs/api/orders/v2/#orders_create!ct=application/json&path=purchase_units/items&t=request. For correct execution of displaying function all OrderDesc(n) Amounts must equal to the Paygate parameter Amount. Example for transferring all variants: Amount=1600 Example including discount: Amount=400 |
TaxTotal | n..10 | C | Mandatory, if +Tax is given in description of OrderDesc(n): Total amount of taxes of all single articles in the smallest currency unit (e.g. EUR Cent) = Sum(Tax*Number) |
ItemTotal | n..10 | C | Mandatory, if +tax is given in description of OrderDesc(n): Gross amount of all single articles in the smallest currency unit (e.g. EUR Cent) = Sum(Amount*Number) |
ShAmount | n..10 | C | Shipping costs in the smallest currency unit (e.g. EUR Cent). Can be used only in case ShAmount <> 0 and connection with parameters ItemTotal and TaxTotal. |
| Key | Format | CND | Description |
|---|---|---|---|
| URLSuccess | ans..256 | M | Complete URL which calls up Paygate if payment has been successful. The URL may be called up only via port 443. This URL may not contain parameters: In order to exchange values between Paygate and shop, please use the parameter UserData.
|
| Key | Format | CND | Description |
|---|---|---|---|
| URLFailure | ans..256 | M | Complete URL which calls up Paygate if payment has been unsuccessful. The URL may be called up only via port 443. This URL may not contain parameters: In order to exchange values between Paygate and shop, please use the parameter UserData.
|
| Key | Format | CND | Description |
|---|---|---|---|
| Response | a7 | O | Status response sent by Paygate to URLSuccess and URLFailure, should be encrypted. For this purpose, transmit Response=encrypt parameter. |
| Key | Format | CND | Description |
|---|---|---|---|
| URLNotify | ans..256 | M | Complete URL which Paygate calls up in order to notify the shop about the payment result. The URL may be called up only via port 443. It may not contain parameters: Use the UserData parameter instead.
|
| Key | Format | CND | Description |
|---|---|---|---|
| UserData | ans..1024 | O | If specified at request, Paygate forwards the parameter with the payment result to the shop. |
| Key | Format | CND | Description |
|---|---|---|---|
| ReqId | ans..32 | O | To avoid double payments or actions (e.g. by ETM), enter an alphanumeric value which identifies your transaction and may be assigned only once. If the transaction or action is submitted again with the same ReqID, Computop Paygate will not carry out the payment or new action, but will just return the status of the original transaction or action. Please note that the Computop Paygate must have a finalized transaction status for the first initial action (authentication/authorisation). This does not apply to 3-D Secure authentications that are terminated by a timeout. The 3-D Secure Timeout status does not count as a completed status in which the ReqID functionality on Paygate does not take effect. Submissions with identical ReqID for an open status will be processed regularly. Notice: Please note that a ReqID is only valid for 12 month, then it gets deleted at the Paygate. |
Key | Format | CND | Description |
|---|---|---|---|
Account | ans..128 | O | For managing multiple PayPal accounts, Merchant account: ID or e-Mail address for which the request should be submitted to PayPal |
| Language | ans5 | O | Language. Please use only the Language values provided by PayPal in the documentation at https://developer.paypal.com/reference/locale-codes/ from the column "BCP-47 code for REST APIs", for example en-GB. If you would like to control the language for the customer on the PayPal login page, please note the sequence of checks at PayPal and how to influence the language accordingly.
|
FirstName | ans..50 | OC | (obligatory for USA and Canada): Either the first name only or first and second name if a company name is used as a delivery address. |
LastName | ans..50 | OC | (obligatory for USA and Canada): Surname or name of the company of the delivery address |
AddrStreet | ans..100 | OC | (obligatory for USA and Canada): Street in the delivery address |
AddrStreet2 | ans..100 | O | 2. Street name in the delivery address that contains additional information e.g. packing station or similar. In order to receive this as a response parameter, it needs to be activated separately by the Computop Helpdesk. |
AddrCity | ans..40 | OC | (obligatory for USA and Canada): Town/city in the delivery address |
AddrState | ans..40 | OC | (obligatory for USA and Canada): Federal state of the delivery address. The town submitted in AddrCity must be located in the given federal state, otherwise PayPal refused this payment. For possible values please refer to the PayPal-API-reference documentation. |
AddrZip | ans..20 | OC | (obligatory for USA and Canada): Postcode in the delivery address |
AddrCountryCode | an2 | O | Country code of the delivery country |
Phone | n..20 | O | Telephone number |
NoShipping | n1 | O | Handover NoShipping=1 prevents the delivery address registered with Paypal from being displayed. Computop Paygate also offers the option to permanently suppress the delivery address for you on your MID. Please note that the delivery address should only be suppressed in the case of digital goods, as the seller protection is also linked to this. Please contact the Computop Helpdesk for this. |
| RiskEvaluation | ans..2048 | O | Array of key-value pair (base64-encoded). List of keys has to be agreed with PayPal (can be different for different merchants) before usage of parameter RiskEvaluation. Example: {
"additional_data": [
{
"key": "sender_first_name",
"value": "John"
},
{
"key": "sender_last_name",
"value": "Doe"
}
]
}
|
PaymentUnit(n) | ans..2048 | O | In case of Multi-Seller Payment (Marketplace functionality) each PaymentUnit(n) is related to a separate Seller (merchant within the Marketplace) and contains JSON object (base64-encoded) with the following format. Example: {
merchantemailaddress: "merchant@example.com",
merchantid: "XVRKM94GQDXB2",
amount: "11000",
itemtotal: "8000",
taxtotal: "2000",
shippingamount: "1000",
invoiceid: "xxxxx",
orderdescription: "yyyyy",
orderitems: [
{
name: "zzzzz",
quantity: "1",
unitamount: "3000",
tax: "1000",
description: "xxxx",
category: "PHYSICAL_GOODS"
},
{
name: "xxxxx",
quantity: "2",
unitamount: "2500",
tax: "500",
description: "yyyyy",
category: "DIGITAL_GOODS"
}
]
}
|
| mode | an8 | O | If mode="redirect" is sent, it means that the merchant does not use PayPal Smart Button and Paygate should redirect the customer to PayPal. if mode is not sent (or sent with any other value except "redirect"), it means that the merchant uses PayPal Smart Button and Paygate will not redirect the customer to PayPal (redirection will be handled by PayPal Smart Button).
|
| CustomerID | ans..10 | O | Used only in case of PayPal Vault (refer to below for the feature description). PayPal-generated unique Customer ID (example: CwCmvBGJhW). In case PayPal Vault is activated on merchant level on Computop side and parameter CustomeriD is provided in request, PayPal mini-browser will show already stored payment options. |
The following table gives the result parameters which Computop Paygate transmits to URLSuccess or URLFailure and URLNotify. If you have specified the Response=encrypt parameter, the following parameters are sent Blowfish encrypted to your system:![]() pls. be prepared to receive additional parameters at any time and do not check the order of parameters
pls. be prepared to receive additional parameters at any time and do not check the order of parameters![]() the key (e.g. mid, RefNr) should not be checked case-sentive
the key (e.g. mid, RefNr) should not be checked case-sentive
| Key | Format | CND | Description |
|---|---|---|---|
ans..30 | M | MerchantID, assigned by Computop |
| Key | Format | CND | Description |
|---|---|---|---|
| PayID | an32 | M | ID assigned by Paygate for the payment, e.g. for referencing in batch files as well as for capture or credit request. |
| Key | Format | CND | Description |
|---|---|---|---|
| XID | an32 | M | ID for all single transactions (authorisation, capture, credit note) for one payment assigned by Paygate |
| Key | Format | CND | Description |
|---|---|---|---|
| TransID | ans..64 | M | TransactionID provided by you which should be unique for each payment |
Key | Format | CND | Description |
|---|---|---|---|
Status | a..50 | M | OK, AUTHORIZE_REQUEST or Timeout (only if Capture=Manual) on the URLSuccess page or FAILED on the URLFailure page. AUTHORIZE_REQUEST – is returned actively only for request parameter "TxType=auth" or "PayPalMethod=shortcut". When using TxType=auth or without TxType the final status is returned directly. Timeout – all open payments with status AUTHORIZE_REQUEST will be closed ~ 3hours later automatically and are reported as Timeout. |
| Key | Format | CND | Description |
|---|---|---|---|
| Description | ans..1024 | M | Further details in the event that payment is rejected. Please do not use the Description but the Code parameter for the transaction status analysis! |
| Key | Format | CND | Description |
|---|---|---|---|
| Code | an8 | M | Error code according to Paygate Response Codes (A4 Error codes) |
| Key | Format | CND | Description |
|---|---|---|---|
an64 | M | Hash Message Authentication Code (HMAC) with SHA-256 algorithm. Details can be found here: |
| Key | Format | CND | Description |
|---|---|---|---|
| refnr | ans..30 | O | Merchant’s unique reference number |
| Key | Format | CND | Description |
|---|---|---|---|
| UserData | ans..1024 | O | If specified at request, Paygate forwards the parameter with the payment result to the shop. |
Key | Format | CND | Description |
|---|---|---|---|
| CodeExt | ans..128 | O | Error code (SCREAMING_SNAKE_CASE) from PayPal if agreed with Computop Helpdesk |
| ErrorText | ans..512 | O | Error description from PayPal if agreed with Computop Helpdesk |
| Name | ans..50 | M | First name and surname joined |
FirstName | ans..50 | M | First name of payer (PayerInfo, may differ from the account name) |
LastName | ans..50 | M | Last name of payer (PayerInfo, may differ from the account name) |
| ans..100 | M | Email address of the purchaser | |
AddrStreet | ans..100 | O | Street in the delivery address |
AddrStreet2 | ans..100 | O | 2. Street name in the delivery address that contains additional information e.g. packing station or similar. In order to receive this as a response parameter, it needs to be activated separately by the Computop Helpdesk. |
AddrCity | ans..40 | O | Town/city in the delivery address |
AddrState | ans..40 | O | Federal State in the delivery address |
AddrZip | ans..20 | O | Postcode in the delivery address |
AddrCountryCode | an2 | O | Country code of the delivery country |
Phone | n..20 | O | Telephone number |
| BillingAgreementID | ans..19 | O | Billing Agreement ID which can be used for subsequent transactions, based on this Billing Agreement. |
BillingName | ans..32 | O | First name and surname joined |
BillingAddrStreet | ans..100 | O | Street name of the invoicing address lodged with PayPal |
BillingAddrStreet2 | ans..100 | O | 2. Street name of the invoicing address lodged with PayPal that contains additional information e.g. packing station or similar. In order to receive this as a response parameter, it needs to be activated separately by the Computop Helpdesk. For the return of billing data, please contact your PayPal contact person directly, who must activate the return for both the live and the sandbox account. |
BillingAddrCity | ans..40 | O | Town/city name of the invoicing address saved with PayPal. For the return of billing data, please contact your PayPal contact person directly, who must activate the return for both the live and the sandbox account. |
BillingAddrState | ans..40 | O | Federal state of the invoicing address saved with PayPal. For the return of billing data, please contact your PayPal contact person directly, who must activate the return for both the live and the sandbox account. |
BillingAddrZIP | ans..20 | O | Postcode of the invoicing address saved with PayPal. For the return of billing data, please contact your PayPal contact person directly, who must activate the return for both the live and the sandbox account. |
BillingAddrCountryCode | an2 | O | Country code of the billing address. For the return of billing data, please contact your PayPal contact person directly, who must activate the return for both the live and the sandbox account. |
| payerStatus | an..10 | O | Status of buyer with possible values "verified" or "unverified" |
InfoText | ans..255 | M | Message to the merchant |
PayerID | ans..13 | O | (if response is activated): Unique identification number of customer account at PayPal |
GrossAmount | an..9 | O | Final amount charged, including any shipping and taxes from your Merchant profile |
FeeAmount | an..9 | O | PayPal fee amount charged for the transaction |
SettleAmount | an..9 | O | Amount deposited in your PayPal account after a currency conversion |
TaxAmount | an..9 | O | Tax charged on the transaction |
ExchangeRate | an..17 | O | Exchange rate if a currency conversion occurred. Relevant only if you are billing in their non-primary currency. If the buyer chooses to pay with a currency other than the non-primary currency, the conversion occurs in the buyer's account. |
mc_fee | an..9 | C | Only in case of separate Notify from PayPal: Transaction fee associated with the payment. mc_gross minus mc_fee equals the amount deposited into the receiver_email account. Equivalent to payment_fee for USD payments. If this amount is negative, it signifies a refund or reversal, and either of those payment statuses can be for the full or partial amount of the original transaction fee. |
mc_gross | an..9 | C | Only in case of separate Notify from PayPal: Full amount of the customer's payment before transaction fee is subtracted. Equivalent to payment_gross for USD payments. If this amount is negative, it signifies a refund or reversal, and either of those payment statuses can be for the full or partial amount of the original transaction. |
| OrderStatus(n) | ans..255 | O | In case of Multi-Seller Payment (Marketplace functionality), each OrderStatus(n) contains Status and Capture ID (to be used in case of Credit) for corresponding OrderDesc(n) sent in request. JSON object (base64-encoded) with the following format. Examples: {"status":"COMPLETED", "id":"3C679366HH908993F1", "invoiceid":"PU1_20230812"}
{"status":"FAILED", "id":"na", "invoiceid":""}
Status has been analysed, because a customer could not have enough money for all merchants. In this case PayPal will approve only some of OrderDesc(n) (only for some merchants). |
| TID | ans..17 | O | In case of SALE, the parameter contains unique PayPal-generated Capture ID. In case of AUTH, the parameter contains unique PayPal-generated Authorization ID. |
| TransactionID | ans..17 | O | The parameter contains unique PayPal-generated Order ID |
| CustomerID | ans..10 | O | Used only in case of PayPal Vault (refer to below for the feature description). PayPal-generated unique Customer ID (example: CwCmvBGJhW). In case PayPal Vault is activated on merchant level on Computop side and customer has chosen in PayPal mini-browser to store the payment method or approved a billing agreement with the merchant (gave the merchant permissions to generate payments without customer involvement in the future). |
| VaultID | ans..17 | O | Used only in case of PayPal Vault (refer to below for the feature description). PayPal-generated unique Vault ID (example: 6xc41489mf360280l). In case PayPal Vault is activated on merchant level on Computop side and customer has chosen in PayPal mini-browser to store the payment method or approved a billing agreement with the merchant (gave the merchant permissions to generate payments without customer involvement in the future). |
Notice: The address parameters are always transmitted to the shop but are empty if no address data has been exchanged.
PayPal Vault feature
PayPal Vault feature has two use cases.
Use case 1: Showing stored payment methods in PayPal mini-browser
In case PayPal Vault is activated on merchant level on Computop side and parameter CustomerID is provided in request, PayPal mini-browser will show already stored payment options like follows.

How it works:
- Merchant is configured for PayPal Vault on Computop side.
- In this case, by calling paypalorders.aspx Computop sends to PayPal a flag to offer the customer the option "store payment method for further usage" in PayPal mini-browser.
- If the customer agrees with the option, the merchant will receive in response parameters CustomerID and VaultID.
- Next time, if the merchant sends CustomerID in paypayorders.aspx request, the customer will see previously stored payment methods (as on the picture above).
Use case 2: Reference transactions (or billing agreement)
How it works:
- Merchant is configured for PayPal Vault on Computop side.
- In this case, by calling paypalorders.aspx Computop sends to PayPal a flag that this is a first payment in a set of payments and PayPal asks the customer to confirm the set of transacitons in PayPal mini-browser.
- If the customer agrees with this, the merchant will receive in response parameters CustomerID and VaultID.
- To initiate next payment (from set of confirmed payments), merchant calls paypalvault.aspx and sends VaultID in parameter BillingAgreementID.
Important note
For both use cases, two notifications will be sent to URLNotify for request paypalorders.aspx. This is because PayPal processes the request in two steps in case of PayPal Vault. During first step, a Vault is created on PayPal side. On this stage parameters CustomerID and VaultID could not be returned. During second step, the Vault is approved on PayPal side. On this step parameters CustomerID and VaultID are created and returned.
So, it is possible that there are no parameters CustomerID and VaultID in first notification. In this case, please wait for second notification (in most of the cases it comes in 5-10 seconds).
Calling the interface for method "shortcut"
The PayPal "shortcut" method enables a changed transaction procedure which takes the customer back to the shop for payment confirmation. To complete this PayPal payment in the next step, use the following URL and parameters:
https://www.computop-paygate.com/paypalComplete.aspx |
Please note the following process description which is triggered by sending "PayPalMethod=shortcut".
By sending "PayPalMethod=shortcut" the end customer will be redirected to PayPal, there he will execute a pre-confirmation (this is not yet the final payment confirmation) and the customer will be redirected back to the store.
The redirect / return is executed here on the URLFailure with the following response parameters. Please note that there is a change here to the older PayPal Classic API. For these the redirect / return is processed on the URLSuccess and via response the open status is reported as follows "Status=AUTHORIZE_REQUEST&Code=00000000&Description=REQUEST".
Please contact the Computop Helpdesk if if you as a retailer would like to process the redirect to URLSuccess and the code and description should be "Status=AUTHORIZE_REQUEST&Code=00000000&Description=REQUEST".
PayPal V2 Response Parameter - open status:
- Status=AUTHORIZE_REQUEST
- Code=21500985
- Description=PENDING
Furthermore it should be noted that the merchant can change the amount for the paypalComplete request after the customer has returned to the open status. However, PayPal has its own restrictions so that the amount cannot be changed upwards arbitrarily. For more details on this topic, please contact your PayPal account manager.
Notice: For security reasons, Computop Paygate rejects all payment requests with formatting errors. Therefore, please use the correct data type for each parameter. The following table describes the encrypted payment request parameters:
| Key | Format | CND | Description |
|---|---|---|---|
ans..30 | M | MerchantID, assigned by Computop. Additionally this parameter has to be passed in plain language too. |
| Key | Format | CND | Description |
|---|---|---|---|
| TransID | ans..64 | M | TransactionID provided by you which should be unique for each payment |
| Key | Format | CND | Description |
|---|---|---|---|
| Amount | n..10 | M | Amount in the smallest currency unit (e.g. EUR Cent). Please contact the Computop Helpdesk, if you want to capture amounts <100 (smallest currency unit). |
| Key | Format | CND | Description |
|---|---|---|---|
| Currency | a3 | M | Currency, three letters DIN / ISO 4217, e.g. EUR, USD, GBP. Please find an overview here: A1 Currency table. Please note the global PayPal supported currencies at https://developer.paypal.com/api/rest/reference/currency-codes/. |
| Key | Format | CND | Description |
|---|---|---|---|
| refnr | ans..30 | O | Merchant’s unique reference number |
Key | Format | CND | Description |
|---|---|---|---|
PayID | an32 | M | ID assigned by Paygate for the payment. Enter the PayID from the response from paypal.aspx received in the previous transaction procedure. |
FirstName | ans..50 | C | Mandatory in order to transfer address information Either the first name only or first and second name if a company name is used as a delivery address. |
LastName | ans..50 | C | Obligatory if FirstName is transmitted: Surname or name of the company of the delivery address |
AddrStreet | ans..100 | C | Obligatory if FirstName is transmitted: Street in the delivery address |
AddrStreet2 | ans..100 | C | Obligatory if FirstName is transmitted: 2. Street name in the delivery address that contains additional information e.g. packing station or similar. In order to receive this as a response parameter, it needs to be activated separately by the Computop Helpdesk. |
AddrCity | ans..40 | C | Obligatory if FirstName is transmitted: Town/city in the delivery address |
AddrState | ans..40 | C | Obligatory if FirstName is transmitted: Federal state of the delivery address. The town submitted in AddrCity must be located in the given federal state, otherwise PayPal refused this payment. For possible values please refer to the PayPal-API-reference documentation. |
AddrZip | ans..20 | C | Obligatory if FirstName is transmitted: Postcode in the delivery address |
AddrCountryCode | an2 | C | Obligatory if FirstName is transmitted: Country code of the delivery country |
Phone | n..20 | C | Obligatory if FirstName is transmitted: Telephone number |
The following table describes the result parameters with which the Computop Paygate responds to your system![]() pls. be prepared to receive additional parameters at any time and do not check the order of parameters
pls. be prepared to receive additional parameters at any time and do not check the order of parameters![]() the key (e.g. mid, RefNr) should not be checked case-sentive
the key (e.g. mid, RefNr) should not be checked case-sentive
| Key | Format | CND | Description |
|---|---|---|---|
ans..30 | M | MerchantID, assigned by Computop |
| Key | Format | CND | Description |
|---|---|---|---|
| PayID | an32 | M | ID assigned by Paygate for the payment, e.g. for referencing in batch files as well as for capture or credit request. |
| Key | Format | CND | Description |
|---|---|---|---|
| XID | an32 | M | ID for all single transactions (authorisation, capture, credit note) for one payment assigned by Paygate |
| Key | Format | CND | Description |
|---|---|---|---|
| TransID | ans..64 | M | TransactionID provided by you which should be unique for each payment |
| Key | Format | CND | Description |
|---|---|---|---|
| Status | a..50 | M | OK (URLSuccess) or FAILED (URLFailure) |
| Key | Format | CND | Description |
|---|---|---|---|
| Description | ans..1024 | M | Further details in the event that payment is rejected. Please do not use the Description but the Code parameter for the transaction status analysis! |
| Key | Format | CND | Description |
|---|---|---|---|
| Code | an8 | M | Error code according to Paygate Response Codes (A4 Error codes) |
| Key | Format | CND | Description |
|---|---|---|---|
| refnr | ans..30 | O | Merchant’s unique reference number |
| Key | Format | CND | Description |
|---|---|---|---|
| CodeExt | n..10 | O | Error code from external partner. Needs to be agreed with Computop Helpdesk. |
Calling the interface for a separate authorization
For a PayPal payment the ORDER can be separated from the subsequent authorization and the following steps. Separate authorization is only possible after the order (TxType=Order) is completed.
For a separate authorization with PayPal, please use the following URL:
https://www.computop-paygate.com/Authorize.aspx |
Notice: For security reasons, Computop Paygate rejects all payment requests with formatting errors. Therefore, please use the correct data type for each parameter. The following table describes the encrypted payment request parameters:
| Key | Format | CND | Description |
|---|---|---|---|
ans..30 | M | MerchantID, assigned by Computop. Additionally this parameter has to be passed in plain language too. |
| Key | Format | CND | Description |
|---|---|---|---|
| PayID | an32 | M | ID assigned by Paygate for the payment, e.g. for referencing in batch files as well as for capture or credit request. |
| Key | Format | CND | Description |
|---|---|---|---|
| TransID | ans..64 | M | TransactionID provided by you which should be unique for each payment |
Key | Format | CND | Description |
|---|---|---|---|
| TxType | ans..5 | M | Transaction type Auth |
| Key | Format | CND | Description |
|---|---|---|---|
| Amount | n..10 | M | Amount in the smallest currency unit (e.g. EUR Cent). Please contact the Computop Helpdesk, if you want to capture amounts <100 (smallest currency unit). |
| Key | Format | CND | Description |
|---|---|---|---|
| Currency | a3 | M | Currency, three letters DIN / ISO 4217, e.g. EUR, USD, GBP. Please find an overview here: A1 Currency table. Please note the global PayPal supported currencies at https://developer.paypal.com/api/rest/reference/currency-codes/. |
Key | Format | CND | Description |
|---|---|---|---|
FirstName | ans..50 | O | Either the first name only or first and second name if a company name is used as a delivery address |
LastName | ans..50 | O | Surname or name of the company of the delivery address |
AddrStreet | ans..100 | O | Street in the delivery address |
AddrStreet2 | ans..100 | O | 2. Street name in the delivery address that contains additional information e.g. packing station or similar. In order to receive this as a response parameter, it needs to be activated separately by the Computop Helpdesk. |
AddrCity | ans..40 | O | Town/city in the delivery address |
AddrState | ans..40 | O | Federal state of the delivery address. The town submitted in AddrCity must be located in the given federal state, otherwise PayPal refused this payment. For possible values please refer to the PayPal-API-reference documentation. |
AddrZip | ans..20 | O | Postcode in the delivery address |
AddrCountryCode | an2 | O | Country code of the delivery country |
Phone | n..20 | O | Telephone number |
The following table describes the result parameters with which the Computop Paygate responds to your system![]() pls. be prepared to receive additional parameters at any time and do not check the order of parameters
pls. be prepared to receive additional parameters at any time and do not check the order of parameters![]() the key (e.g. mid, RefNr) should not be checked case-sentive
the key (e.g. mid, RefNr) should not be checked case-sentive
| Key | Format | CND | Description |
|---|---|---|---|
ans..30 | M | MerchantID, assigned by Computop |
| Key | Format | CND | Description |
|---|---|---|---|
| PayID | an32 | M | ID assigned by Paygate for the payment, e.g. for referencing in batch files as well as for capture or credit request. |
| Key | Format | CND | Description |
|---|---|---|---|
| XID | an32 | M | ID for all single transactions (authorisation, capture, credit note) for one payment assigned by Paygate |
| Key | Format | CND | Description |
|---|---|---|---|
| TransID | ans..64 | M | TransactionID provided by you which should be unique for each payment |
| Key | Format | CND | Description |
|---|---|---|---|
| Status | a..50 | M | OK (URLSuccess) or FAILED (URLFailure) |
| Key | Format | CND | Description |
|---|---|---|---|
| Description | ans..1024 | M | Further details in the event that payment is rejected. Please do not use the Description but the Code parameter for the transaction status analysis! |
| Key | Format | CND | Description |
|---|---|---|---|
| Code | an8 | M | Error code according to Paygate Response Codes (A4 Error codes) |
Key | Format | CND | Description |
|---|---|---|---|
| CodeExt | ans..128 | O | Error code (SCREAMING_SNAKE_CASE) from PayPal if agreed with Computop Helpdesk |
| ErrorText | ans..512 | O | Error description from PayPal if agreed with Computop Helpdesk |
Capture
To carry out a capture for PayPal via a Server-to-Server connection, please use the following URL:
https://www.computop-paygate.com/capture.aspx |
Notice: For security reasons, Computop Paygate rejects all payment requests with formatting errors. Therefore, please use the correct data type for each parameter. The following table describes the encrypted payment request parameters:
| Key | Format | CND | Description |
|---|---|---|---|
ans..30 | M | MerchantID, assigned by Computop. Additionally this parameter has to be passed in plain language too. |
| Key | Format | CND | Description |
|---|---|---|---|
| PayID | an32 | M | ID assigned by Paygate for the payment, e.g. for referencing in batch files as well as for capture or credit request. |
| Key | Format | CND | Description |
|---|---|---|---|
| TransID | ans..64 | M | TransactionID provided by you which should be unique for each payment |
| Key | Format | CND | Description |
|---|---|---|---|
an64 | M | Hash Message Authentication Code (HMAC) with SHA-256 algorithm. Details can be found here: |
| Key | Format | CND | Description |
|---|---|---|---|
| Amount | n..10 | M | Amount in the smallest currency unit (e.g. EUR Cent). Please contact the Computop Helpdesk, if you want to capture amounts <100 (smallest currency unit). |
| Key | Format | CND | Description |
|---|---|---|---|
| Currency | a3 | M | Currency, three letters DIN / ISO 4217, e.g. EUR, USD, GBP. Please find an overview here: A1 Currency table. Please note the global PayPal supported currencies at https://developer.paypal.com/api/rest/reference/currency-codes/. |
Key | Format | CND | Description |
|---|---|---|---|
| RefNr | ans..30 | O | Merchant reference number: here a separate reference number, e.g. an invoice number, can be transferred |
| Key | Format | CND | Description |
|---|---|---|---|
| ReqId | ans..32 | O | To avoid double payments or actions (e.g. by ETM), enter an alphanumeric value which identifies your transaction and may be assigned only once. If the transaction or action is submitted again with the same ReqID, Computop Paygate will not carry out the payment or new action, but will just return the status of the original transaction or action. Please note that the Computop Paygate must have a finalized transaction status for the first initial action (authentication/authorisation). This does not apply to 3-D Secure authentications that are terminated by a timeout. The 3-D Secure Timeout status does not count as a completed status in which the ReqID functionality on Paygate does not take effect. Submissions with identical ReqID for an open status will be processed regularly. Notice: Please note that a ReqID is only valid for 12 month, then it gets deleted at the Paygate. |
Key | Format | CND | Description |
|---|---|---|---|
| TID | ans..17 | O | Unique PayPal-generated Capture ID. The value is required for a refund after several partial captures. Example: A merchant did 3 partial captures for an authorization. For each capture unique PayPal-generated Capture ID is returned in TID (e.g., TID=111, TID=222, TID=333). Then, a refund for second capture should be done. In this case the merchant needs to send TID=222 in refund request. |
| CompleteType | ans..3 | O | If <YES> is transferred, the possible open order of PayPal is closed on capture. (Reason: a 115% capture is permissible on the part of PayPal. If a capture reached 100%, Paygate automatically sends a request to close the payment). |
The following table describes the result parameters with which the Computop Paygate responds to your system![]() pls. be prepared to receive additional parameters at any time and do not check the order of parameters
pls. be prepared to receive additional parameters at any time and do not check the order of parameters![]() the key (e.g. mid, RefNr) should not be checked case-sentive
the key (e.g. mid, RefNr) should not be checked case-sentive
| Key | Format | CND | Description |
|---|---|---|---|
ans..30 | M | MerchantID, assigned by Computop |
| Key | Format | CND | Description |
|---|---|---|---|
| PayID | an32 | M | ID assigned by Paygate for the payment, e.g. for referencing in batch files as well as for capture or credit request. |
| Key | Format | CND | Description |
|---|---|---|---|
| XID | an32 | M | ID for all single transactions (authorisation, capture, credit note) for one payment assigned by Paygate |
| Key | Format | CND | Description |
|---|---|---|---|
| TransID | ans..64 | M | TransactionID provided by you which should be unique for each payment |
| Key | Format | CND | Description |
|---|---|---|---|
| Status | a..50 | M | OK (URLSuccess) or FAILED (URLFailure) |
| Key | Format | CND | Description |
|---|---|---|---|
| Description | ans..1024 | M | Further details in the event that payment is rejected. Please do not use the Description but the Code parameter for the transaction status analysis! |
| Key | Format | CND | Description |
|---|---|---|---|
| Code | an8 | M | Error code according to Paygate Response Codes (A4 Error codes) |
Key | Format | CND | Description |
|---|---|---|---|
| CodeExt | ans..128 | O | Error code (SCREAMING_SNAKE_CASE) from PayPal if agreed with Computop Helpdesk |
| ErrorText | ans..512 | O | Error description from PayPal if agreed with Computop Helpdesk |
Credit with reference
To carry out a credit with a reference transaction for PayPal, please use the following URL:
https://www.computop-paygate.com/credit.aspx |
Notice: For security reasons, Computop Paygate rejects all payment requests with formatting errors. Therefore, please use the correct data type for each parameter. The following table describes the encrypted payment request parameters:
| Key | Format | CND | Description |
|---|---|---|---|
ans..30 | M | MerchantID, assigned by Computop. Additionally this parameter has to be passed in plain language too. |
| Key | Format | CND | Description |
|---|---|---|---|
| PayID | an32 | M | ID assigned by Paygate for the payment to be credited |
| Key | Format | CND | Description |
|---|---|---|---|
| TransID | ans..64 | M | TransactionID provided by you which should be unique for each payment |
| Key | Format | CND | Description |
|---|---|---|---|
an64 | M | Hash Message Authentication Code (HMAC) with SHA-256 algorithm. Details can be found here: |
| Key | Format | CND | Description |
|---|---|---|---|
| Amount | n..10 | M | Amount in the smallest currency unit (e.g. EUR Cent). Please contact the Computop Helpdesk, if you want to capture amounts <100 (smallest currency unit). |
| Key | Format | CND | Description |
|---|---|---|---|
| Currency | a3 | M | Currency, three letters DIN / ISO 4217, e.g. EUR, USD, GBP. Please find an overview here: A1 Currency table. Please note the global PayPal supported currencies at https://developer.paypal.com/api/rest/reference/currency-codes/. |
Key | Format | CND | Description |
|---|---|---|---|
| RefNr | ans..30 | O | Merchant reference number: here a separate reference number, e.g. an invoice number, can be transferred |
| Key | Format | CND | Description |
|---|---|---|---|
| ReqId | ans..32 | O | To avoid double payments or actions (e.g. by ETM), enter an alphanumeric value which identifies your transaction and may be assigned only once. If the transaction or action is submitted again with the same ReqID, Computop Paygate will not carry out the payment or new action, but will just return the status of the original transaction or action. Please note that the Computop Paygate must have a finalized transaction status for the first initial action (authentication/authorisation). This does not apply to 3-D Secure authentications that are terminated by a timeout. The 3-D Secure Timeout status does not count as a completed status in which the ReqID functionality on Paygate does not take effect. Submissions with identical ReqID for an open status will be processed regularly. Notice: Please note that a ReqID is only valid for 12 month, then it gets deleted at the Paygate. |
Key | Format | CND | Description |
|---|---|---|---|
| TID | ans..17 | O | Unique PayPal-generated Capture ID. The value is required for a refund after several partial captures. Example: A merchant did 3 partial captures for an authorization. For each capture unique PayPal-generated Capture ID is returned in TID in capture response (e.g., TID=111, TID=222, TID=333). Then, a refund for second capture should be done. In this case the merchant needs to send TID=222 in refund request. |
| Note | ans..768 | C | Explanatory text for recipient |
| Subject | ans..255 | C | MassPay: E-Mail subject to recipient Notice: If you want to use the MassPay functionality, please contact the Computop Helpdesk to activate this function for you. |
The following table describes the result parameters with which the Computop Paygate responds to your system![]() pls. be prepared to receive additional parameters at any time and do not check the order of parameters
pls. be prepared to receive additional parameters at any time and do not check the order of parameters![]() the key (e.g. mid, RefNr) should not be checked case-sentive
the key (e.g. mid, RefNr) should not be checked case-sentive
| Key | Format | CND | Description |
|---|---|---|---|
ans..30 | M | MerchantID, assigned by Computop |
| Key | Format | CND | Description |
|---|---|---|---|
| PayID | an32 | M | ID assigned by Paygate for the payment, e.g. for referencing in batch files as well as for capture or credit request. |
| Key | Format | CND | Description |
|---|---|---|---|
| XID | an32 | M | ID for all single transactions (authorisation, capture, credit note) for one payment assigned by Paygate |
| Key | Format | CND | Description |
|---|---|---|---|
| TransID | ans..64 | M | TransactionID provided by you which should be unique for each payment |
| Key | Format | CND | Description |
|---|---|---|---|
| Status | a..50 | M | OK (URLSuccess) or FAILED (URLFailure) |
| Key | Format | CND | Description |
|---|---|---|---|
| Description | ans..1024 | M | Further details in the event that payment is rejected. Please do not use the Description but the Code parameter for the transaction status analysis! |
| Key | Format | CND | Description |
|---|---|---|---|
| Code | an8 | M | Error code according to Paygate Response Codes (A4 Error codes) |
Key | Format | CND | Description |
|---|---|---|---|
| CodeExt | ans..128 | O | Error code (SCREAMING_SNAKE_CASE) from PayPal if agreed with Computop Helpdesk |
| ErrorText | ans..512 | O | Error description from PayPal if agreed with Computop Helpdesk |
FeeRefundAmount | n..10 | O | The refunded amount of the PayPal transaction fees. Required for part credit notes to prior partial captures. |
GrossRefundAmount | n..10 | O | Amount refunded to the buyer in this refund transaction. Required for part credit notes to prior partial captures. |
NetRefundAmount | n..10 | O | Amount deducted from your PayPal account to make this refund. Required for part credit notes to prior partial captures. |
Reversal
In order to cancel a transaction with PayPal, please use the following URL:
https://www.computop-paygate.com/reverse.aspx |
Notice: For security reasons, Computop Paygate rejects all payment requests with formatting errors. Therefore, please use the correct data type for each parameter. The following table describes the encrypted payment request parameters:
| Key | Format | CND | Description |
|---|---|---|---|
ans..30 | M | MerchantID, assigned by Computop. Additionally this parameter has to be passed in plain language too. |
| Key | Format | CND | Description |
|---|---|---|---|
| PayID | an32 | M | ID assigned by Paygate for the payment to be reversed |
| Key | Format | CND | Description |
|---|---|---|---|
| TransID | ans..64 | M | TransactionID provided by you which should be unique for each payment |
| Key | Format | CND | Description |
|---|---|---|---|
an64 | M | Hash Message Authentication Code (HMAC) with SHA-256 algorithm. Details can be found here: |
| Key | Format | CND | Description |
|---|---|---|---|
| Amount | n..10 | M | Amount in the smallest currency unit (e.g. EUR Cent). Please contact the Computop Helpdesk, if you want to capture amounts <100 (smallest currency unit). |
| Key | Format | CND | Description |
|---|---|---|---|
| Currency | a3 | M | Currency, three letters DIN / ISO 4217, e.g. EUR, USD, GBP. Please find an overview here: A1 Currency table. Please note the global PayPal supported currencies at https://developer.paypal.com/api/rest/reference/currency-codes/. |
| Key | Format | CND | Description |
|---|---|---|---|
| ReqId | ans..32 | O | To avoid double payments or actions (e.g. by ETM), enter an alphanumeric value which identifies your transaction and may be assigned only once. If the transaction or action is submitted again with the same ReqID, Computop Paygate will not carry out the payment or new action, but will just return the status of the original transaction or action. Please note that the Computop Paygate must have a finalized transaction status for the first initial action (authentication/authorisation). This does not apply to 3-D Secure authentications that are terminated by a timeout. The 3-D Secure Timeout status does not count as a completed status in which the ReqID functionality on Paygate does not take effect. Submissions with identical ReqID for an open status will be processed regularly. Notice: Please note that a ReqID is only valid for 12 month, then it gets deleted at the Paygate. |
The following table describes the result parameters with which the Computop Paygate responds to your system![]() pls. be prepared to receive additional parameters at any time and do not check the order of parameters
pls. be prepared to receive additional parameters at any time and do not check the order of parameters![]() the key (e.g. mid, RefNr) should not be checked case-sentive
the key (e.g. mid, RefNr) should not be checked case-sentive
| Key | Format | CND | Description |
|---|---|---|---|
ans..30 | M | MerchantID, assigned by Computop |
| Key | Format | CND | Description |
|---|---|---|---|
| PayID | an32 | M | ID assigned by Paygate for the payment, e.g. for referencing in batch files as well as for capture or credit request. |
| Key | Format | CND | Description |
|---|---|---|---|
| XID | an32 | M | ID for all single transactions (authorisation, capture, credit note) for one payment assigned by Paygate |
| Key | Format | CND | Description |
|---|---|---|---|
| TransID | ans..64 | M | TransactionID provided by you which should be unique for each payment |
| Key | Format | CND | Description |
|---|---|---|---|
| Status | a..50 | M | OK (URLSuccess) or FAILED (URLFailure) |
| Key | Format | CND | Description |
|---|---|---|---|
| Description | ans..1024 | M | Further details in the event that payment is rejected. Please do not use the Description but the Code parameter for the transaction status analysis! |
| Key | Format | CND | Description |
|---|---|---|---|
| Code | an8 | M | Error code according to Paygate Response Codes (A4 Error codes) |
Key | Format | CND | Description |
|---|---|---|---|
| CodeExt | ans..128 | O | Error code (SCREAMING_SNAKE_CASE) from PayPal if agreed with Computop Helpdesk |
| ErrorText | ans..512 | O | Error description from PayPal if agreed with Computop Helpdesk |
Reference Transactions
Prerequisites
- Option "Reference Transactions“ has to be activated in your PayPal account. Please request the activation at PayPal directly.
Process
The process contains two steps.
Billing Agreement Creation (initial Billing Agreement transaction)
- Call PayPalOrders.aspx with TxType=BAID (refer to ). In response Paygate returns URL. All parameters except the following are optional in case of TxType=BAID.
- By the URL customer logs in to PayPal account and approves the Billing Agreement.
- Once the Billing Agreement is approved by the customer, Billing Agreement ID will be send using URLNotify.
Billing Agreement Usage
- Call PayPalRefTrans.aspx (described below, as server-to-server request) with BillingAgreementID="Billing Agreement ID" created on previous step. Customer does not need to login to PayPal account for transaction approval anymore.
Revoking of Billing Agreement
- A customer can revoke Billing Agreement ID in own PayPal account.
- If a customer revokes Billing Agreement ID no further subsequent reference transactions (using this Billing Agreement ID) are possible. It is also not possible to reactivate this Billing Agreement ID.
Request
In order to initiate a PayPal subscription payment, please use the following URL:
https://www.computop-paygate.com/paypalreftrans.aspx |
Notice: For security reasons, Computop Paygate rejects all payment requests with formatting errors. Therefore, please use the correct data type for each parameter. The following table describes the encrypted payment request parameters:
| Key | Format | CND | Description |
|---|---|---|---|
ans..30 | M | MerchantID, assigned by Computop. Additionally this parameter has to be passed in plain language too. |
| Key | Format | CND | Description |
|---|---|---|---|
| TransID | ans..64 | M | TransactionID provided by you which should be unique for each payment |
| Key | Format | CND | Description |
|---|---|---|---|
| Amount | n..10 | M | Amount in the smallest currency unit (e.g. EUR Cent). Please contact the Computop Helpdesk, if you want to capture amounts <100 (smallest currency unit). |
| Key | Format | CND | Description |
|---|---|---|---|
| Currency | a3 | M | Currency, three letters DIN / ISO 4217, e.g. EUR, USD, GBP. Please find an overview here: A1 Currency table. Please note the global PayPal supported currencies at https://developer.paypal.com/api/rest/reference/currency-codes/. |
| Key | Format | CND | Description |
|---|---|---|---|
| refnr | ans..30 | O | Merchant’s unique reference number |
Key | Format | CND | Description |
|---|---|---|---|
| OrderDesc | ans..30 | O | Description of purchased goods, unit prices etc. |
| BillingAgreementID | an19 | M | Identification number of the invoice agreement. When the buyer confirms the invoice agreement it is validated and remains valid until revoked by the buyer. |
Response
The following table describes the result parameters with which the Computop Paygate responds to your system![]() pls. be prepared to receive additional parameters at any time and do not check the order of parameters
pls. be prepared to receive additional parameters at any time and do not check the order of parameters![]() the key (e.g. mid, RefNr) should not be checked case-sentive
the key (e.g. mid, RefNr) should not be checked case-sentive
| Key | Format | CND | Description |
|---|---|---|---|
ans..30 | M | MerchantID, assigned by Computop |
| Key | Format | CND | Description |
|---|---|---|---|
| PayID | an32 | M | ID assigned by Paygate for the payment, e.g. for referencing in batch files as well as for capture or credit request. |
| Key | Format | CND | Description |
|---|---|---|---|
| XID | an32 | M | ID for all single transactions (authorisation, capture, credit note) for one payment assigned by Paygate |
| Key | Format | CND | Description |
|---|---|---|---|
| TransID | ans..64 | M | TransactionID provided by you which should be unique for each payment |
| Key | Format | CND | Description |
|---|---|---|---|
| Status | a..50 | M | OK (URLSuccess) or FAILED (URLFailure) |
| Key | Format | CND | Description |
|---|---|---|---|
| Description | ans..1024 | M | Further details in the event that payment is rejected. Please do not use the Description but the Code parameter for the transaction status analysis! |
| Key | Format | CND | Description |
|---|---|---|---|
| Code | an8 | M | Error code according to Paygate Response Codes (A4 Error codes) |
Key | Format | CND | Description |
|---|---|---|---|
| CodeExt | ans..128 | O | Error code (SCREAMING_SNAKE_CASE) from PayPal if agreed with Computop Helpdesk |
| ErrorText | ans..512 | O | Error description from PayPal if agreed with Computop Helpdesk |
| Key | Format | CND | Description |
|---|---|---|---|
| refnr | ans..30 | O | Merchant’s unique reference number |
Key | Format | CND | Description |
|---|---|---|---|
| OrderID | ans..17 | O | Unique PayPal-generated OrderID |
| TID | ans..17 | O | Unique PayPal-generated CaptureID |
| Name | ans..32 | O | First name and surname joined |
FirstName | ans..50 | O | First name of payer (PayerInfo, may differ from the account name) |
LastName | ans..50 | O | Last name of payer (PayerInfo, may differ from the account name) |
| ans..100 | O | Email address of the purchaser | |
BillingName | ans..32 | O | First name and surname joined |
BillingAddrCountryCode | an2 | O | Country code of the billing address |
PayerID | ans..13 | O | (if response is activated): Unique ID of customer account at PayPal |
Vault
Prerequisites
- Option "Vault“ has to be activated in your PayPal account. Please request the activation at PayPal directly.
Process
The process contains two steps.
Vault creation (initial Vault transaction)
- Call PayPalOrders.aspx. If the function is activated on your MID then PayPal/Computop Paygate will provide the VaultID.
- By the URL customer logs in to PayPal account and approves the Vault.
- Once the Vault is approved by the customer, VaultID will be send using URLNotify.
Vault usage
- Call PayPalRefTrans.aspx (described below, as server-to-server request) with VaultID="VaultID" created on previous step. Customer does not need to login to PayPal account for transaction approval anymore.
Revoking of Vault
- A customer can revoke VaultID in own PayPal account.
- If a customer revokes VaultID no further subsequent reference transactions (using this VaultID) are possible. It is also not possible to reactivate this VaultID.
Request
In order to initiate a PayPal subscription payment, please use the following URL:
https://www.computop-paygate.com/paypalvault.aspx |
Notice: For security reasons, Computop Paygate rejects all payment requests with formatting errors. Therefore, please use the correct data type for each parameter. The following table describes the encrypted payment request parameters:
| Key | Format | CND | Description |
|---|---|---|---|
ans..30 | M | MerchantID, assigned by Computop. Additionally this parameter has to be passed in plain language too. |
| Key | Format | CND | Description |
|---|---|---|---|
| TransID | ans..64 | M | TransactionID provided by you which should be unique for each payment |
| Key | Format | CND | Description |
|---|---|---|---|
| Amount | n..10 | M | Amount in the smallest currency unit (e.g. EUR Cent). Please contact the Computop Helpdesk, if you want to capture amounts <100 (smallest currency unit). |
| Key | Format | CND | Description |
|---|---|---|---|
| Currency | a3 | M | Currency, three letters DIN / ISO 4217, e.g. EUR, USD, GBP. Please find an overview here: A1 Currency table. Please note the global PayPal supported currencies at https://developer.paypal.com/api/rest/reference/currency-codes/. |
| Key | Format | CND | Description |
|---|---|---|---|
| refnr | ans..30 | O | Merchant’s unique reference number |
Key | Format | CND | Description |
|---|---|---|---|
| OrderDesc | ans..30 | O | Description of purchased goods, unit prices etc. |
| VaultID | an19 | M | Identification number of the invoice agreement. When the buyer confirms the invoice agreement it is validated and remains valid until revoked by the buyer. |
Response
The following table describes the result parameters with which the Computop Paygate responds to your system![]() pls. be prepared to receive additional parameters at any time and do not check the order of parameters
pls. be prepared to receive additional parameters at any time and do not check the order of parameters![]() the key (e.g. mid, RefNr) should not be checked case-sentive
the key (e.g. mid, RefNr) should not be checked case-sentive
| Key | Format | CND | Description |
|---|---|---|---|
ans..30 | M | MerchantID, assigned by Computop |
| Key | Format | CND | Description |
|---|---|---|---|
| PayID | an32 | M | ID assigned by Paygate for the payment, e.g. for referencing in batch files as well as for capture or credit request. |
| Key | Format | CND | Description |
|---|---|---|---|
| XID | an32 | M | ID for all single transactions (authorisation, capture, credit note) for one payment assigned by Paygate |
| Key | Format | CND | Description |
|---|---|---|---|
| TransID | ans..64 | M | TransactionID provided by you which should be unique for each payment |
| Key | Format | CND | Description |
|---|---|---|---|
| Status | a..50 | M | OK (URLSuccess) or FAILED (URLFailure) |
| Key | Format | CND | Description |
|---|---|---|---|
| Description | ans..1024 | M | Further details in the event that payment is rejected. Please do not use the Description but the Code parameter for the transaction status analysis! |
| Key | Format | CND | Description |
|---|---|---|---|
| Code | an8 | M | Error code according to Paygate Response Codes (A4 Error codes) |
Key | Format | CND | Description |
|---|---|---|---|
| CodeExt | ans..128 | O | Error code (SCREAMING_SNAKE_CASE) from PayPal if agreed with Computop Helpdesk |
| ErrorText | ans..512 | O | Error description from PayPal if agreed with Computop Helpdesk |
| Key | Format | CND | Description |
|---|---|---|---|
| refnr | ans..30 | O | Merchant’s unique reference number |
Key | Format | CND | Description |
|---|---|---|---|
| OrderID | ans..17 | O | Unique PayPal-generated OrderID |
| TID | ans..17 | O | Unique PayPal-generated CaptureID |
| Name | ans..32 | O | First name and surname joined |
FirstName | ans..50 | O | First name of payer (PayerInfo, may differ from the account name) |
LastName | ans..50 | O | Last name of payer (PayerInfo, may differ from the account name) |
| ans..100 | O | Email address of the purchaser | |
BillingName | ans..32 | O | First name and surname joined |
BillingAddrCountryCode | an2 | O | Country code of the billing address |
PayerID | ans..13 | O | (if response is activated): Unique ID of customer account at PayPal |
Package tracking
Using Package Tracking feature, it is possible to assign parcel tracking numbers to PayPal orders after a shipping label is created. Providing the shipping details helps to identify items in transit, and improve the in-app payer experience. Also, the shipping information is used by PayPal in dispute resolution process.
To add or remove shipping details via a Server-to-Server connection, please use the following URL:
https://www.computop-paygate.com/trackdelivery.aspx |
Notice: For security reasons, Computop Paygate rejects all payment requests with formatting errors. Therefore, please use the correct data type for each parameter. The following table describes the encrypted payment request parameters:
| Key | Format | CND | Description |
|---|---|---|---|
ans..30 | M | MerchantID, assigned by Computop. Additionally this parameter has to be passed in plain language too. |
| Key | Format | CND | Description |
|---|---|---|---|
| PayID | an32 | M | ID assigned by Paygate for the payment, e.g. for referencing in batch files as well as for capture or credit request. |
| Key | Format | CND | Description |
|---|---|---|---|
| TransID | ans..64 | M | TransactionID provided by you which should be unique for each payment |
| Key | Format | CND | Description |
|---|---|---|---|
an64 | M | Hash Message Authentication Code (HMAC) with SHA-256 algorithm. Details can be found here: |
| Key | Format | CND | Description |
|---|---|---|---|
| Amount | n..10 | M | Amount in the smallest currency unit (e.g. EUR Cent). Please contact the Computop Helpdesk, if you want to capture amounts <100 (smallest currency unit). |
| Key | Format | CND | Description |
|---|---|---|---|
| Currency | a3 | M | Currency, three letters DIN / ISO 4217, e.g. EUR, USD, GBP. Please find an overview here: A1 Currency table. Please note the global PayPal supported currencies at https://developer.paypal.com/api/rest/reference/currency-codes/. |
Key | Format | CND | Description |
|---|---|---|---|
EventToken | a..6 | M | Possible values: "add", "remove" |
TrackingNumber | ans..64 | C | Tracking number provided by carrier. Must be provided in case of EventToken="add". |
CarrierName | ans..128 | C | Either carrier name from list of carriers provided by PayPal (link) or "OTHER". Must be provided in case of EventToken="add". |
CarrierNameOther | ans..128 | C | Must be provided in case of EventToken="add" and CarrierName="OTHER" |
TID | ans..17 | O | In case of multiple captures (e.g., partial captures), it is possible to provide a tracking number for particular capture. Valid only in case of EventToken="add". |
OrderItems | ans..2048 | O | Array of JSON objects OrderItem. Valid only in case of EventToken="add". |
The following table describes the result parameters with which the Computop Paygate responds to your system![]() pls. be prepared to receive additional parameters at any time and do not check the order of parameters
pls. be prepared to receive additional parameters at any time and do not check the order of parameters![]() the key (e.g. mid, RefNr) should not be checked case-sentive
the key (e.g. mid, RefNr) should not be checked case-sentive
| Key | Format | CND | Description |
|---|---|---|---|
ans..30 | M | MerchantID, assigned by Computop |
| Key | Format | CND | Description |
|---|---|---|---|
| PayID | an32 | M | ID assigned by Paygate for the payment, e.g. for referencing in batch files as well as for capture or credit request. |
| Key | Format | CND | Description |
|---|---|---|---|
| XID | an32 | M | ID for all single transactions (authorisation, capture, credit note) for one payment assigned by Paygate |
| Key | Format | CND | Description |
|---|---|---|---|
| TransID | ans..64 | M | TransactionID provided by you which should be unique for each payment |
| Key | Format | CND | Description |
|---|---|---|---|
| Status | a..50 | M | OK (URLSuccess) or FAILED (URLFailure) |
| Key | Format | CND | Description |
|---|---|---|---|
| Description | ans..1024 | M | Further details in the event that payment is rejected. Please do not use the Description but the Code parameter for the transaction status analysis! |
| Key | Format | CND | Description |
|---|---|---|---|
| Code | an8 | M | Error code according to Paygate Response Codes (A4 Error codes) |
Key | Format | CND | Description |
|---|---|---|---|
CodeExt | ans..128 | O | Error code (SCREAMING_SNAKE_CASE) from PayPal if agreed with Computop Helpdesk. |
| ErrorText | ans..512 | O | Error description from PayPal if agreed with Computop Helpdesk |
TrackerID | ans..30 | M | PayPal-generated unique tracker id. This value should be sent in parameter TrackerID with EventToken="remove" (e.g., when tracking information is sent by a mistake, and it should be removed). |
Batch processing via the interface
Basic information about using Batch files and about their structure can be found in the Batch Manager manual. Within batch processing not alle functions are available which are usually available for the online interface.
This section describes the parameters which must be transferred within the data set (Record) for executing a PayPal payment and which information can be found within the response file about the payment status.
For Batch calls there must be considered batch versions, from which optional parameters depend. All version designations starting with „2.“ pertain calls for a group of enterprises. That means within a batch file for a particular MerchantID can be transferred transactions for other merchants with a separate Sub-MID.
Following table gives an overview of all batch versions that are possible for a specific action and their specialities:
Action | Version | Description |
|---|---|---|
| Authorize | 1.0 / 2.0 | Standard version without return of parameter Code |
1.4 / 2.4 | with TID | |
| Capture | 1.0 / 2.0 | Standard version without return of parameter Code |
1.x / 2.x | with RefNr (valid for all versions other than 1.0) | |
1.4 / 2.4 | with TID | |
Credit | 1.0 / 2.0 | Standard version without return of parameter Code |
1.x / 2.x | with RefNr (valid for all versions other than 1.0) | |
| 1.4 / 2.4 | with TID | |
| CreditEx | 1.0 / 2.0 | Standard version without return of parameter Code |
1.x / 2.x | with RefNr (valid for all versions other than 1.0) | |
| Reverse | 1.0 / 2.0 | Standard version without return of parameter Code |
1.4 / 2.4 | with TID | |
| ABO/REFTRANS | 1.0 / 2.0 | ABO - Classic PayPal API REFTRANS - Order V2 PayPal API Standard version without return of parameter Code |
1.x / 2.x | with RefNr (valid for all versions other than 1.0) |
The structure for a PayPal payment within a Batch file to be submitted is the following:
HEAD,<MerchantID>,<Date>,<Version>
PAYPAL,Authorize,<Amount>,<Currency>,<TransID>,<PayID>
PAYPAL,Capture,<Amount>,<Currency>,<TransID>,(<RefNr>,)<PayID>,(<TID>)
PAYPAL,Credit,<Amount>,<Currency>,<TransID>,(<RefNr>,)<PayID>,(<TID>)
PAYPAL,CreditEx,<TransID>,(<RefNr>,)<Amount>,<Currency>,<payer>,<note>
PAYPAL,Reverse,<Amount>,<Currency>,<TransID>,(<RefNr>,)<PayID>,(<TID>)
PAYPAL,REFTRANS,<Amount>,<Currency>,<TransID>,(<RefNr>),(<OrderDesc>),(<Capture>),(<TxType>),<BillingAgreementId>
FOOT,<CountRecords>,<SumAmount>
Example for Master MID function:
HEAD,[Master]MerchantID,Date,2.x
Type,Action,[Slave]MID,Amount,Currency,TransID,Data (depends on Action)
FOOT,CountRecords,SumAmount
Notice: In Version 1.4 it is also possible to transfer CompleteType together with a Capture action:
PAYPAL,Capture,<Amount>,<Currency>,<TransID>,(<RefNr>,)<PayID>(,<CompleteType>,<TID>)
The following table describes the individual fields and values used within the data set (record) in the batch file:
Key | Format | CND | Description |
|---|---|---|---|
Type | a..11 | M | HEAD for Header, FOOT for Footer, PAYPAL for PayPal |
Action | a..20 | M | The parameter Action defines the type of transaction: Authorize REFTRANS (subscription, Order V2 API) |
| Key | Format | CND | Description |
|---|---|---|---|
| Amount | n..10 | M | Amount in the smallest currency unit (e.g. EUR Cent). Please contact the Computop Helpdesk, if you want to capture amounts <100 (smallest currency unit). |
| Key | Format | CND | Description |
|---|---|---|---|
| Currency | a3 | M | Currency, three letters DIN / ISO 4217, e.g. EUR, USD, GBP. Please find an overview here: A1 Currency table. Please note the global PayPal supported currencies at https://developer.paypal.com/api/rest/reference/currency-codes/. |
| Key | Format | CND | Description |
|---|---|---|---|
| TransID | ans..64 | M | TransactionID provided by you which should be unique for each payment |
| Key | Format | CND | Description |
|---|---|---|---|
| refnr | ans..30 | O | Merchant’s unique reference number |
Key | Format | CND | Description |
|---|---|---|---|
| payer | ans..100 | O | MassPay: Email address of the purchaser: In this case you transfer the received email parameter from the Response If you want to use the MassPay functionality, please contact the Computop Helpdesk to activate this function for you. |
| note | ans..758 | O | Explanatory text for recipient |
| Key | Format | CND | Description |
|---|---|---|---|
| PayID | an32 | M | ID assigned by Paygate for this transaction |
Key | Format | CND | Description |
|---|---|---|---|
| TID | ans..17 | O | PayPal unique transaction number. Required for a number of authorisations or part captures, part credit notes or part cancellations. |
| OrderDesc | ans..127 | O | Description of purchased goods, unit prices etc. |
| Capture | a..6 | O | Auto or Manual: determines whether the requested amount is settled immediately or at a later stage. For REFTRANS only Auto is possible. |
| TxType | ans..5 | OC | Obligatory for Capture=Manual: Transaction type with possible values Order and Auth |
BillingAgreementID | an19 | OC | Identification number of the invoice agreement. When the buyer confirms the invoice agreement it is validated and remains valid until revoked by the buyer. Mandatory in case of ABO and REFTRANS. |
The record area within the response file for Batch transactions looks as follows:
HEAD,<MerchantID>,<Date>,<Version>
PAYPAL,Authorize,<Amount>,<Currency>,<TransID>,<PayID>,<Status>,<Code>,<CodeExt>
PAYPAL,Capture,<Amount>,<Currency>,<TransID>,(<RefNr>,)<PayID>,(<TID>,)<Status>,<Code>,<CodeExt>
PAYPAL,Credit,<Amount>,<Currency>,<TransID>,(<RefNr>,)<PayID>,(<TID>,)<Status>,<Code>,<CodeExt>
PAYPAL,CreditEx,<TransID>,(<RefNr>,)<Amount>,<Currency>,<payer>,<note>,<Status>,<Code>,<CodeExt>
PAYPAL,Reverse,<Amount>,<Currency>,<TransID>,(<RefNr>,)<PayID>,(<TID>,)<Status>,<Code>,<CodeExt>
PAYPAL,REFTRANS,<Amount>,<Currency>,<TransID>,(<RefNr>),(<OrderDesc>),(<Capture>),(<TxType>),<BillingAgreementId>,<PayID>,<Status>,<Code>,<CodeExt>
FOOT,<CountRecords>,<SumAmount>
The following table describes the response parameters which the Batch Manager saves in the Record area for each transaction (standard parameters not explained here, such as <TransID> or <RefNR> and request parameters are returned unchanged and correspond to the call as specified before):
Key | Format | CND | Description |
|---|---|---|---|
Action | a..20 | M | The parameter Action defines the type of transaction like capture or credit. |
| Key | Format | CND | Description |
|---|---|---|---|
| PayID | an32 | M | ID assigned by Paygate for this transaction |
| Key | Format | CND | Description |
|---|---|---|---|
| Status | a..50 | M | OK (URLSuccess) or FAILED (URLFailure) |
| Key | Format | CND | Description |
|---|---|---|---|
| Code | an8 | M | Error code according to Paygate Response Codes (A4 Error codes) |
Key | Format | CND | Description |
|---|---|---|---|
| CodeExt | ans..128 | O | Error code (SCREAMING_SNAKE_CASE) from PayPal if agreed with Computop Helpdesk |
| ErrorText | ans..512 | O | Error description from PayPal if agreed with Computop Helpdesk |